Up
Fabric Data
Contact us:
Simply Circus, Inc
info@simplycircus.com
86 Los Angeles St
Newton, MA 02458
617-527-0667
617-431-7352 (Gym)


| |
AERIAL RIGGING WEEK - Aug 29 - Sep 2, 2011
Want to learn more about rigging? Simply Circus is hosting a week
long Aerial Rigging workshop! For more information, or to sign up, click here!
Table of Contents
- 1.
About this FAQ
- 1.1. Copyright
- 1.2. Latest version
- 1.3. Questions about the Simply Circus Wiki
- 1.4. Disclaimer
- 2. General
Questions About Aerial Arts
- 3. Names
and Descriptions of individual Aerial Apparatus
- 3.1. Aerial Hoop
- 3.2. Aerial Silks
- 3.3. Cloud Swing
- 3.4. Corde Lisse
- 3.5. Cradle
- 3.6. Hair Hang
- 3.7. Russian Swing
- 3.8. Shoot-Through Ladder
- 3.9. Spanish Web
- 3.10 Straps
- 3.11. Trapeze
- 3.11.1. Static Trapeze
- 3.11.2. Swinging Trapeze
- 3.11.3. Flying Trapeze
- 3.11.4. Low Casting
- 3.11.5. Washington Trapeze
- 3.11.6. Dance Trapeze
- 3.11.7. Multiple Trapeze
- 3.11.8. French Trapeze
- 4.
Hand and Body Care for Aerialists
- 4.1. Basic Hand Care
- 4.2. Calluses
- 4.3. Caring for Rips
- 4.4. Caring for Swollen Knuckles
- 4.5. Toughening up the Skin
- 4.6. Aches, Pains and Other Soreness
- 5.
Better Hand Grips
- 5.1. Wrapping Metal apparatus
- 5.2. Chalk, Rosin and other such products
- 5.3. Hand Grip Aids
- 6.
Selecting Aerial Apparatus
- 6.1. Selecting an Aerial Hoop
- 6.2. Selecting a Trapeze Bar
- 6.2.1. Notes on wooden trapeze bars
- 6.3. Selecting Aerial Silks
- 6.4. Selecting a Web (Spanish Web, Corde Lisse, Cloud Swing,
etc)
- 7.
Inspecting and Maintaining Aerial Apparatus
- 7.1. Metal Apparatus (Lyra, Trapeze Bars, etc)
- 7.1.1. Cursory inspection
- 7.1.2. Full Inspection
- 7.2. Rope based Apparatus (Spanish Web, Corde Lisse, Cloud Swing, etc)
- 7.2.1. Cursory inspection
- 7.3. Aerial Fabrics
- 7.3.1. Cursory inspection
- 7.3.2. Full inspection
- 8.
Rigging
- 8.1. General Rigging Questions and Theory
- 8.2. More on Weights and Measures
- 8.3. Rigging Components
- 8.3.1. Choice in Materials
- 8.3.2. Choice of Components
- 8.3.3. Knots, hitches and splices
- 8.4. Questions About Aerial Rigs and Mount Points
- 8.5. Questions About Rigging Specific Apparatus
- 8.5.1. Aerial Hoop / Lyra
- 8.5.1.1. Rigging Diagram - Single Tab
- 8.5.1.2. Rigging Diagram - Double Tab
- 8.5.2. Aerial Fabrics
- 8.5.3. Cloud Swing
- 8.5.3.1. Rigging Diagram - Single Mount Point
- 8.5.3.2. Rigging Diagram - Double Mount Points
- 8.5.4. Corde Lisse / Spanish Web
- 8.5.4.1. Rigging Diagram
- 8.5.4.2 Attaching Hand Loops
- 8.5.5. Hair Hang
- 8.5.5.1. Hair Hang on a Pulley Diagram
- 8.5.6. Trapeze
- 8.5.6.1. Static or Swinging Trapeze Diagram
- 8.5.6.2. Dance Trapeze Diagram
- 8.5.6.3. Dance Trapeze on a Pulley Diagram
- 8.5.7 Straps
- 9.
Liability and Insurance
- 10.
Aerial Arts and Rigging Resources
- 10.1. Mailing Lists
- 10.2. Websites
- 10.3. Books on Aerial Arts and Rigging
- 10.4. Videos on Aerial Arts and Rigging
- 5.4.1. Finding videos on the internet
- 10.5. Software
- 10.6. Equipment Vendors
1. About this FAQ
1.1 Copyright
This document is copyright 2006 by Steven Santos / Simply Circus, Inc. (www.SimplyCircus.com),
all rights reserved. This document can not be reproduced without the expressed
written consent of Steven Santos / Simply Circus, Inc. This includes
posting this FAQ to any other website without permission. If you run an
aerial arts program and want to post a copy of this FAQ on your website, print
it up and distribute it to your students, or make other such use of it, you need
to ask.
1.2 Latest version
The latest version of this document can always be found at:
http://community.simplycircus.com/tutorials/aerial_arts_faq.htm
1.3 Questions about the Simply Circus Wiki
Q. What is the Simply Circus Wiki?
A. The Simply Circus Wiki is one of the primary educational and knowledge
management tools used by Simply Circus to develop, store and share our written
knowledge of circus arts. The wiki was created by, and is edited and maintained
by Simply Circus.
Q. Who is this wiki designed for?
A. This wiki is a resource intended for the students of Simply Circus.
Q. Why isn't the entire wiki open to the public?
A. We have made a select number of the resources on this wiki available to
the public. While we understand that access to the entire wiki would be
extremely useful to many others, its not fair for our students to pay for this
resource (via class fees or electronic access fees), and everyone else get it
for free. We will continue to make selected articles available to the public on
a case-by-case basis.
Q. If you open the wiki up, wouldn't the influx of people help to maintain
it, making it less expensive to maintain, and their forth viable to give to
everyone?
A. We have experimented with this a few times, all unsuccessfully.
We tried seeding Wikipedia with circus skills articles. We did a major
rewrite of the Circus
Skills page back in July
of 2005 to bring that page in line with the equivalent page on the Simply
Circus wiki, and we have made many edits to it since then to keep it more or
less inline with our page. We created and seeded a number of other Wikipedia
circus articles with information copied directly (though not in the entirety)
from entries from our wiki (edits by cirque115, 71.243.107.218 and 68.160.12.57
are the same people maintaining this wiki). After 9 months, the result has been
very little outside contribution, with many article having never had another
contributor edit them.
We had marginally more success contributing to the aerial riggers wiki. We
contributed an article on rigging Chinese poles. This article drew a number of
very useful comments, however at this time, the Chinese poles article is the
only full article on the Arial riggers wiki. (UPDATE: The Aerial Riggers WIKI is
no more).
While we have not yet been successful, we might be willing to try again. If
you think you have an idea of how to make it work, let us know, we are more than
happy to entertain the idea.
Q. OK, the wiki is not freely available to the public. Can I buy access to
it?
A. We are exploring the various isues involved in how that would work. We
may have something in the Winter of 2010.
Q. Who can I contact with other questions about this wiki / FAQ, or
suggested additions to this FAQ?
A. You can send all such comments to: Info@SimplyCircus.com
1.4 Disclaimer
Suspending people in mid-air is inherently dangerous. Damage to persons and
property, including death, can result. This FAQ is an attempt to share knowledge
and experience and to promote safety. But do not rely on anything you read here
without verifying its accuracy and applicability to what you are doing.
Neither the authors of this FAQ nor Simply Circus Inc. makes any
representations as to the safety or appropriateness of any practice or equipment
recommendation contained herein. Always consult with your own qualified expert.
** If you do follow any practices presented here, **
** know that you do so at your own risk.
**
It is very important that each of us understands the limitations of our own
knowledge, experience and ability. We need to know what we don�t know, and
know what we can and can�t do safely. If you have any doubt at all, get
professional expert help.
We also make no representation about the legality of any particular practice.
All jurisdictions have codes and regulations which may apply to what you are
doing. Be sure to ensure your compliance with all such applicable codes and
regulations, as well as any limitations which may be required by insurance
companies.
2. General Questions About Aerial Arts
Q. Are Aerial Arts Safe?
A. At the recreational level, so long as it is done with proper equipment,
training and supervision, aerial arts are as safe as any other recreational
sport or rigorous physical activity you may engage in.
Q. What aerial arts exist?
A. There are many aerial arts in common use. See the next section of this
FAQ for a list and description of the various aerial apparatus.
Q. Where can I find a book, video or tutorial on performing aerial skills?
A. You can check the resources section of this FAQ for helpful tutorials,
websites, books and videos on aerial arts. We strongly suggest you talk with
your aerial instructor about what you read/watch.
Q. I have seen people do this aerial arts stuff, and it doesn't look that
hard. Do I really need an instructor, and if so for what?
A. A good instructor/coach is highly recommended. A qualified instructor
will help you to learn the basic skills of the apparatus you are training on. A
good coach will help you map out a training route, give you ideas for training,
help you problem solve, keep you excited about the art, and most importantly
help you learn how to do a lot of this on your own.
Q. How do I rig XXX?
A. If you have to ask, you probably shouldn't be rigging it. In this FAQ we
do include enough basic rigging information that you should be able to get a
general idea of some basic rigging concepts, and understand generally how an
apparatus should be rigged. We include this for informational purposes only.
Consult your own qualified rigger to rig anything that a person will actually
fly on.
3. Names and Descriptions of individual Aerial Apparatus
In this section we try to give you the names and brief descriptions of the
various aerial apparatus in general use. Please note that when more than one
name exists for a given art, we have used the most common name, and given the
alternative names in the text.
3.1 Aerial Hoop
Aerial
Hoop, also known as "Circeaux" and "Lyra", is a steel
apparatus that looks like a suspended hula-hoop. Aerial hoops are usually
available in single tab and double tab configurations. The act itself usually
combines static and swinging trapeze skills with held poses and postures.
3.2 Aerial Silks
Silks,
also known as "Tissues" or "Fabrics", is an apparatus
consisting of a long piece of cloth with the center of the cloth suspended from
above. The act itself involves one or more flyers performing held postures,
wraps and drops. (Click Here to Order Aerial Fabrics)
3.3 Cloud Swing
Cloud
Swing is an aerial apparatus that resembles a Spanish web in the type,
length and width of material, but has loops on each end of the apparatus that
are fastened to mount points, with the swing itself hanging in a V-shape. Hand
and foot loops are typically attached loops to secure hand and foot dives. The
act itself usually combines static and swinging trapeze skills, drops, dives,
holds and rebound lifts. "Mexican Cloud Swing" is a variation on the
cloud swing, but without the hand and foot loops. Instead, the performer uses
their bodies to tie knots in the swing.
3.4 Corde Lisse
Corde
Lisse, also known as "Rope" or "Smooth Rope", is an
aerial apparatus that resembles a vertically hanging rope, but it is usually
made from soft cotton about 25-30mm thick, with a loop on the top side of the
rope. The act itself usually combines held postures, wraps and drops.
3.5 Cradle
Cradle,
also known as "Casting Cradle" is a an aerial apparatus resembling a
large rectangular frame. The frame can be fixed (static or freestanding) or
swinging. The act itself involves two performers, the first being the catcher,
and the second being the flyer. The catcher hangs by his or her knees from the
frame, while the flyer swings holding on to the catchers hands. The flyer
performs releases at the top of the swing and is re-caught in mid air. The flyer
usually starts and end standing on the frame above the catcher.
3.6 Hair Hang
Hair
Hang is a method of rigging a performers hair to allow aerial flight. The
act itself involves a performer performing various poses, spinning, and doing
other tricks while suspended.
3.7 Russian Swing
Russian
Swing is an aerial apparatus most closely resembling a large playground
swing. The seat is replaced by a platform (usually about 4'x6') and the chains
of the playground swing are replaced by four solid arms. The swing hangs from a
frame very much resembling a traditional double A-frame swing set frame. The
Russian Swing has the ability to catapult a performer over 30 feet in the air.
The act itself is most closely related to the teeterboard (aka Korean Plank),
with the flyers performing somersaults, twists and other aerial acrobatics
before landing on crash mats, nets or other such landing areas.
3.8 Shoot-Through Ladder
Shoot-Through
Ladder is a custom built aerial apparatus resembling a metal ladder
revolving around a central axle. On one half of the ladder the rungs have been
replaced with a trapeze. The act itself involves one flyer balancing the ladder,
while a second performer does static or swinging trapeze skills on the attached
trapeze bar. The name "Shoot-Through Ladder" comes from the ability of
the trapeze flyer to swing or shoot through the ladder.
3.9 Spanish Web
Spanish
Web is an aerial apparatus almost identical to the Corde Lisse, but with the
addition of loops for hands or feet. The act itself involves everything that can
be done with Corde Lisse, as well as many spinning motions made possible with
the additional hand loops. A "web sitter" is often used to pull
tension on the bottom of the web and to turn the web, spinning the flyer.
3.10 Straps
Straps,
also known as "Aerial Straps" and "Aerial Ribbon", is a
cotton or nylon web apparatus that looks like two suspended ribbons. Straps are
available in various configurations, including those with various types of loops
at the ends and those without loops. The act itself usually includes held poses
and postures done on the straps, dance moves performed on the floor away from
the straps, partner acrobatics done on and off the straps as well as having the
straps pulled up and let down during the act.
3.11 Trapeze
Trapeze
is the overall name for a collection of closely related aerial apparatus. All
trapezes are basically one or more suspended horizontal bars with vertical lines
attaching it to the overhead mount point or points.
3.11.1 Static Trapeze
Static
Trapeze is a trapeze that is not used for swinging. Static Trapeze is
usually 6 feet or more off the ground. The act itself most commonly involves
poses, hangs, drops and rope skills.
3.11.2 Swinging Trapeze
Swinging
Trapeze is a trapeze that is used for swinging. Swinging trapezes usually
have a 12 foot swing (the distance from the mount point to the trapeze bar),
with the bar at least 10 feet off the ground. The act itself usually involves
all of the skills used in static trapeze, as well as skills that revolve around
the swing of the trapeze.
3.11.3 Flying Trapeze
Flying
Trapeze is really two trapezes. The first is virtually identical to a
swinging trapeze, with the addition of a raised platform for the flyer to start
their swing from. The second catch trapeze is typically a smaller straight armed
swinging trapeze. The act itself usually involves all aspects of swinging
trapeze, as well as skills revolving around jumping from trapeze to trapeze, or
from trapeze to catcher.
3.11.4 Low Casting
Low
Casting is a mini flying trapeze rig. The act itself uses various flying and
partner trapeze skills.
3.11.5 Washington Trapeze
Washington
Trapeze, also known as "Heavy Trapeze", is a variation on static
and swinging trapeze. The trapeze bar used for Washington Trapeze is typically
much heavier than a normal trapeze bar, and has a small (~4" round)
headstand platform on it. Washington Trapeze typically involves all aspects of
static and swinging trapeze, with the addition of various headstand skills
performed on the bar.
Dance
Trapeze is a low trapeze mounted to a single point. Dance Trapeze combines
aspects of static trapeze, swinging trapeze, modern dance and many other
disciplines to form a fairly unique art form.
3.11.7 Multiple Trapeze
Multiple
Trapezes come in a number of shapes and sizes. The most common multiple
trapeze is the Double Trapeze (available in side-by-side and over-under
configurations). The Triple Trapeze (as well as larger multiples, available in
side-by-side, over-under and mixed configurations) are also commonly found. As
the name implies, these apparatuses are designed for use by multiple
simultaneous flyers, and allow for a variety of additional skills to be
performed on the apparatus. The last multiple is known as the Shaped Trapeze.
These are typically custom build apparatus designed for specific acts or shows,
and can take virtually any shape imaginable.
3.11.8 French Trapeze
French
Trapeze is a variation on Multiple trapeze where two performers perform
combinations of static trapeze skills as well various partner lifting skills
where one performer holds the other and manipulates them into a variety of
positions and poses.
4. Hand and Body Care for Aerialists
As an aerialist, you must take good care of your hands and body. The key
points to good hand care are basic hand care (regular cleaning and moisturizing
of the hands), care of calluses, and care of rips. We have also included some
notes on swollen knuckles and toughening up the skin. Recently, we have also
begun including some information on general body care for aerialists as well.
4.1 Basic Hand Care
Grip aids (such as Chalk or rosin) tend to dehydrate the skin. To help
counter this effect make sure you wash your hands and wrists thoroughly with hot
water and a good soap as soon as you complete your aerial workout. Use scrub
brushes (such as a surgeon's scrub brush) to help get every bit of the
"grip aid" off. While the skin is still soft and the pores still open,
you should use a good quality hand lotion (such as Vaseline intensive care or
Corn Huskers) to replenish the moisture in the skin.
4.2 Calluses
There is no way to prevent the formation of calluses on the hands of an
aerialist. Thankfully, having that tough skin on the hands is a good thing, as
long as you take care of it and remember that those calluses have to be flexible
and supple.
You should always keep your calluses trimmed. Take a look in the foot care
isle of your local pharmacy for a range of products designed to trim and care
for calluses. Among the more commonly used callus care tools are pumice stones
and callus razors.
Remember, dry, tough calluses will rip sooner than moist ones, so pay close
attention to your basic hand care!
For one method of removing calluses from the hands, see the calluses removal
tutorial at http://www.beastskills.com/calluses.htm
4.3 Caring for Rips
The most common cause of blisters and rips is over gripping of the apparatus.
If your hand is in the proper place (with the bar at the base of the fingers,
not centered in the palm) you will have less of the sliding and friction that
causes most blisters and tears.
The second most common cause of blisters and rips is gripping the apparatus
too tightly. remember that you don't have to choke the life out of the apparatus
to stay on.
When you do get a rip, make sure you clean your hands carefully. Use a
disinfectant, such as hydrogen peroxide or Betadine on the open wounds. You
might want to follow that up with a moisturizing agent, such as Neosporin or
other moisturizing antibiotic ointment. The key to healing a rip is to keep the
new skin supple as it toughens up during the healing process (again, basic hand
care).
Swollen knuckles are sometimes a problem when first learning vertical apparatus such as silks and Spanish web, as
holding these vertical apparatus strains your fingers more than say holding a
trapeze bar. As you build strength in your hands and fingers, this should go
away naturally. Ice and ibuprofen applied / taken after a workout is also known
to help. Make sure you discuss this issue with your aerial coach or instructor.
4.5 Toughening up the Skin
Aerialists need to develop tough skin. The following are common suggestions
for toughening up the skin:
- The sandpaper method. Rubbing your hands with sandpaper daily or every
other day basis works well.
- Tincture of Benzoin. Available from any running supply house, this is
known to toughen up skin, and it acts as an adhesive for keeping bandages on
- Cramer's "Tuff Skin" spray is also know to toughen up the skin
(and provide extra grip). It is available from various medical supply
companies.
- Urine. The acidity of the yellow stuff will help toughen up your hands.
- Diluted white vinegar. Same effect as the yellow stuff, but without the
associated germs, smells and general yuck factor.
4.6. Aches, Pains and Other Soreness
Q. Is it normal to have aches and pains from doing aerials?
A. Yes, it is. Aches, pains, soreness, and fatigue are all common
problems for aerialists. While these are common problems, their is a lot you can
do to help reduce these issues
Q. Why do I have these aches and pains?
A. Their are a number of factors that can cause an aerialist aches and
pains. For a new aerialist, soreness is usually caused by using muscles
you are not used to using. We recommend speaking with your aerial coach
about your specific issues.
Q. What should I do prior to, during and after an aerial session to help
reduce the aches and pains?
A. Their are a number of things that can help reduce the pains, including:
- Hydrate before, during and after any aerial session. Being
dehydrated can significantly increase muscle fatigue and soreness, as well
as increasing the time it takes to build up the muscles you are now using.
- Keep your muscles warm. Keeping your muscles warm improves blood
flow to those areas, which gives you greater flexibility.
- Do a cardio warm-up prior to doing any aerial arts
- Stretch out after you have warmed up
- Use warm-ups, sweat suits or other items of clothing to keep warm
- Keep moving, even while you are waiting
- Use Aspirin, ibuprofen or other over the counter pain medication after a
hard work out, or when expecting aches/pains to help reduce inflammation.
(Note: Check with your doctor, and always follow the label!
- Ice sore muscles
- Take warm bathes to warm up stiff muscles
- Use warming gels such as Tiger Balm on stiff muscles
5. Better Hand Grips
A good hand grip is extremely important when it comes to aerials. Different
5.1 Wrapping Metal apparatus
Metal aerial apparatus (trapeze bars, Lyra, etc) are generally wrapped with
tape to help with grip. In general, you want to use a one-inch wide,
non-zinc oxide athletic tape (Zinc Oxide is what makes taped bars feel extra
sticky, or like it is coated in residue). Hockey tape and bicycle
handlebar tape are also acceptable.
Start taping at one end of the bar, and continue all the way across to the
other side of the bar, overlapping the tape by about a half inch each wrap (for
a total of two layers of tape). Try to make your lines match up as closely
as possible without overlapping (no third layers!)
\ \ - First turn
\\ \ - Second turn
\\\ \ - Third turn
\\\\ \ - Forth turn (etc.)
When you finish, you should have a nice, smooth surface to grip your
apparatus. When you have finished wrapping your metal apparatus,
apply gymnastics chalk to taste.
When rewrapping, make sure to remove all tape and glue residue before
starting to rewrap the apparatus
5.2 Chalk, Rosin and other such products
A number of products are regularly suggested on the trapeze@yahoogroups.com
for getting a better grip on various aerial apparatus. The following
are the most common suggestions:
- Gymnastics Chalk. Available from various gymnastics supply houses,
chalk helps the flyer to grip metal apparatus, as well as preventing the
apparatus from becoming sticky or slippery.
- Spray chalk. Found under various brand names, spray chalk is a powdered
chalk mixed with medical grade alcohol. It spreads evenly over your hands
and dries very quickly
- Rosin. Rosin is generally available from Theatrical Suppliers (who usually
offer best value on Rosin). When you can find it in theatrical supply shops,
it usually comes in big chunks in big bags. Dance supply shops will also
generally carry it, however it is usually more expensive than it would be at
a theatrical supply house. Last but not least you can often find it in Music
Shops, as string players use it. (hint: You'll want double-bass size)
- Spray Rosin. Spray Rosin is a liquid mixture of rosin and alcohol.
Spray Rosin is more commonly used with aerial fabrics (aka silks, tissue)
- Liquid Rosin
mixture
- Hair Spray is an old-timers trick for better grip
- Anti-Slip Spray. Cramer's "Tuff Skin" and "Firm
Grip" sprays are often recommended. Both of these are available
from various medical supply companies.
5.3 Hand Grips
Q. I would like to have a set of hand grips available for when I have
tares. What kinds of grips are available?
A. A number of people make personalized grips just for the trapeze, while
other use various gymnastics (see the section on Equipment Vendors), and still
other use improvised grips.
Q. What are the differences between the different personalized grips?
A. Each grip has its own advantages and disadvantages. What is right
for you will come down to personal preference. The best advice is to talk
to the vendors of these grips and see what best meets your needs.
Q. What are the differences between the different gymnastics grips?
A. While gymnastics grips generally come in two designs - with the dowel,
and without - this also mostly comes down to personal preference. The
dowel gives your hand more protection, but less feel.
Q. What are improvised grips, and how do I make them?
A. The most common improvised grips are grips made out of athletic tape.
To make a hand grip out of athletic tape, start by taking two lengths of tape
approximately 2-3 inches longer than the length from your wrist to base of your
middle finger. 2-ply it over on itself, then cut a slit about a half inch
from one end to fit over one of the middle fingers while anchoring the other end
against your wrist with a second piece of tape.
The advantages of this kind of grip are that (1) its a good way to feel the
bar (2) its personalized to cover only the parts of the hand that need it and
(3) its inexpensive.
The disadvantages of this kind of grip are (1) if the tape is too tight, it
breaks (2) if it's too long, it won't adequately protect the palm and (3) you
have to make it each flying session.
5.3 Proper Grips
Q. I have heard of something called a "power grip" on rope apparatus
- what is it?
A. A power grip is a method of using your wrist to get better friction on a
rope based apparatus. When most people hold a fabric, the allow their
wrists bend, and we rely entirely on the strength of our fingers to apply
pressure to the fabric to hold us up. The "power grip" is when
we straighten out the wrist so that the fabric bends into a bit z in your
hand. This gives you a lot more friction in your grip - as much as 3x more
friction.
6. Selecting Aerial Apparatus
Choosing the right equipment for you and your needs / situation can be a
tough thing. The following notes should be of some assistance to those that are
in the market for aerial apparatus.
6.1 Selecting an Aerial Hoop
Q. How do I size my aerial hoop?
A. Properly sizing an aerial hoop or Lyra can be a difficult thing to do. So
much of it comes down to individual flexibility, personal preference, and what
you are comfortable with. The following is a very general guide. We highly
recommend speaking with your vendor about what size Lyra you need.
- 34" Lyra is generally best for a performer under 5'6"
- 35" Lyra is generally best for a performer under 5'8"
- 36" Lyra is generally best for a performer under 6'
A second method of selecting an aerial hoop is to sit in a chair, measure
from the seat of the chair to the top of the head, and add an inch.
Q. One Tab or Two?
A. Depends on how you are going to use it, what effect you are after and
what you are comfortable with. The following is list of just a few things you
might want to take into account when choosing your aerial hoop:
- If you do not want your aerial hoop to spin, you want a double tab.
- If you want a trapeze like swing, you want a double tab
- If you want spin, you can use either a single or a double tab (see rigging
section)
- If you want to use your aerial hoop like a dance trapeze, you want a
single tab
- If you want to swing along more than one axis, you want a single tab
Q. Solid, or hollow hoop?
A. This depends on how you are going to use it, specifically the amount any
type of spin you want. A solid hoop has more mass to it, making it harder
to get it spinning than a hollow hoop. Once it gets spinning, a solid hoop
will keep spinning much longer than a hollow hoop will.
In addition to the spin being different, the difference in weight will also
change many of the artistic lines for positions on the hoop. Last but
not least, think about storage, transportation and setup, and how the weight of
the hoop will effect each of these.
Q. Do I want a crossbar on my aerial hoop?
A. Again, the answer to this depends on how you are going to use it, what
effect you are after and what you are comfortable with. If you do not make use
of the bar, or if the bar gets in your way, then you don't want one. If you use
the bar, or if it is part of the effect your after, then you obviously do want
your aerial hoop to have a crossbar.
Q. Should I have hand/foot loops on my aerial hoop?
A. Again, the answer to this depends on how you are going to use it, what
effect you are after and what you are comfortable with. If you use the hand/foot
loop, or if it is part of the effect your after, then you obviously do want your
aerial hoop to have the loop.
In the case of a hand/foot loop, when in doubt it is a good idea to get the
loop. They are inexpensive enough that even if you never use it, its not a big
loss. On the flip side, it can be torture if you have to wait several weeks for
one to come in so that you can do that skill that requires it, or that you don't
yet have the hand strength to do without it.
Q. I want to know more about how an aerial hoop is built, what can you
tell me?
A. In recent months, two excellent articles have been written documenting
how each author built their own aerial hoops.
6.2 Selecting a Trapeze Bar
Q. What kind of trapeze bar do I need?
A. Choosing the Proper trapeze bar can be a difficult thing to do. So much
of it comes down to personal preference, what you are comfortable with, and what
you are doing. We highly recommend speaking with your vendor about what trapeze
bar is right for you.
Some points to think about:
- Padded or unpadded?
- Will you be doing rope work above the bar?
- If so, think about the kind of rope you want to work with.
- Single or multiple?
- How long of a bar should I get?
- Do you want the bar to extend past the ropes, or not?
- How long of a bar do you need to be able to sit comfortably on the bar
with your fists gripping the bar on each side of your hips?
- How thick of a bar do I want?
- Most circus trapeze bars have an outer diameter of �" or
1", while dance trapeze bars are also sometimes found with outer
diameters of 1�" and 1�". You should try
different sized bars and select a bar with the diameter you are most
comfortable with.
6.2.1. Wooden Trapeze Bars
Q. What is the history of wooden trapeze bars?
A. While we have not been able to find the exact origin of wooden trapeze
bars, we do know that they were a popular gym apparatus from the mid-late 1800's
up through the 1930's. Wooden trapeze bars were commonly found in school
and church gyms during that time period. During the period from 1910 to 1930,
trapezes were generally removed from schools, with safety the most often reason
sited for the removal.
Q. Are wooden trapeze bars still used?
A. Surprisingly enough, yes. Many in the aerial dance community swear
by them.
Q. What are the arguments for using wooden trapeze bars?
A. There are several reasons commonly given for using trapeze bars,
including:
- The feel of the wood bars. Many aerial dance performers like the
feel of the wooden bars
- Wood bars can be used un-taped
- Wooden bars are lighter than metal bars
- When they are not on them, wooden bars can be moved around stage by a
performer in such a way they seem to float
- Wooden bars do not have to be taped, this allows the performers to slither
on the bars
- Wooden trapeze bar can give the performer an extra spring from the bar
verses a metal trapeze bar
Q. What are the arguments against using wooden trapeze bars?
A. The following are reasons commonly given for not using wooden trapeze
bars:
- Low safety factor. Wooden bars can have as low as a 2.5:1 normal
safety ratio (see section 8.1 for questions on a normal safety ratio).
- Difficulty in determining the strength of a particular piece of wood.
We are unable to accurately determine the breaking strength of a given
wooden bar due to the imperfections in the wood. This is compounded by
the fact that imperfections may not to noticeable to the naked eye.
Q. Does Simply Circus use or allow the use of dimensional wood trapeze
bars?
A. No, they do not meet our minimum safety factor for use with students.
We may allow the use of metal core and/or laminate wood bars that meet our
minimum safety factor.
Q. Do wooden trapeze bars break in the middle of the bar, or at the ends
where the rope attaches?
A. Most of the breaks that we are aware of happened in the middle of the
bar, however breaks are also known to happen where the bar is attached to the
rope.
Q. Couldn't you use a metal core to get the feel of a wooden bar, and the
strength of a metal bar?
A. That depends on who you ask. Many aerial dancers dislike the
additional weight of a steel or aluminum metal cores, and so will not use them.
In theory, a titanium core in a wooden bar should give a flyer the best of both,
including the low weight of an all wood bar and the strength of a steel bar.
At the time of this writing (11/2006) Simply Circus is unaware of anyone
manufacturing such a bar.
Q. Couldn't you use a laminated wood trapeze bar to get an acceptable
strength, while retaining the weight, feel and other effects of natural wood?
A. In theory, yes, it should be possible to do with a 1-1/4" bar made
from 13 or more laminated layers of hardwood. Laminated layers of wood are
typically a lot stronger than equally sized dimensional wood. The use of
alternating layers will also generally make up for any imperfections found in
any single piece of wood, and allows for much greater predictability of strength
from one piece to the next. These factors would seem to indicate that, at
least in theory, it should be possible to build a laminated wood trapeze bar
with a normal safety factor high enough for student use, yet retaining all of
the benefits of natural wood bars. At the time of this writing (11/2006)
Simply Circus is unaware of anyone manufacturing such a bar, though it should be
within the skill range of most finish carpenters and cabinet makers.
(Note: If anyone does choose to build and load test a batch of laminate
trapeze bars, please share your load
testing data with us)
Q. You said that wooden trapeze bars were used in the 1800's. I
would like to compare construction of those to modern metal bars. Where
can I get information on how those were made?
A. See this
link for information on how people built wooden trapeze bars in the 1860's,
including details on how they strengthened the connectors between the bar and
the ropes.
6.3 Selecting Aerial Silks
Q. What do I need to know about choosing aerial silks / fabrics?
A. When buying aerial fabrics from a vendor that specializes in selling
fabric to aerialists, you want to think about the stretch, width and length of
the fabric you need. (You can also Click Here to Order Aerial Fabrics from Simply Circus)
Low stretch fabrics are easier to climb than medium stretch fabrics, but they
are not as soft for big drops. Medium stretch fabrics are nice for drops, but
are a little harder for beginners to climb. High stretch fabrics are even nicer
for drops, but virtually impossible for beginners to climb.
Aerial Fabrics come in a variety of widths. A 60" width is generally
recommended for children, where as a larger width (75", 90" or
108" widths) are generally recommended for teens and adults. At widths of
75" and above, the choice mostly comes down to a personal or artistic
preference.
Aerial fabrics are generally cut to length depending on the height you are
mounting it to. For beginners, you want the fabric to come down past the ground.
For intermediate users and above, you want the fabrics to come down to the
ground.
Q. I am going down to the local fabric store to buy fabrics for my aerial
act. What do I need to know to do this safely?
A. We advise you in the strongest possible terms to go through a reputable
aerial fabric vendor (many are listed in the Equipment section of this FAQ, or you can (Click Here to Order Aerial Fabrics from Simply Circus)).
If you insist on proceeding, you have a lot of research to conduct, and a lot of
factors to take into account. As most of the aerial fabrics in use are polyester
based, the following selection criteria is based on the use of polyester (Note:
The same general steps should be used for other types of fabrics as well).
Polyester is a man-made fiber. Modern methods of poly processing yield threads
and yarns that are extremely consistent and its properties are well known
(tenacity up to 85 cN/tex), however your research may turn up other
alternatives. Choosing the right fabric for your needs can be at least
somewhat complex, though the following should be enough to get you started:
First, you have to choose from the two primary types of polyester, PET (or
polyethylene terephthalate) and PCDT (or poly-1, 4-cyclohexylene-dimethylene
terephthalate). PET is the more common type, as it is stronger than PCDT, though
PCDT is more elastic and resilient than PET is.
Next you need to know the kind of yarn. Is it a filament yarn (a yarn made
from a single monofilament fiber), a spun yarn (yarn made from thousands of
smaller fibers in much the same way cotton yarn is made), or a blend (spun with
nylon, cotton, etc). Filament yarn is more consistent than a spun yarn, however
the overall difference in strength is small enough that it is hard to notice. Be
aware that nylon blends tend to "pill" much more easily than others
do.
Then you have to select a yarn size (denier). The higher the denier, the thicker
the yarn. For spun poly, 35 denier and above seems to be strong enough for use
in aerial fabrics.
The last things we have to select are the weave (well, knit), the width and the
thread count. Modern machine weaving and knitting techniques make it possible to
get fabrics that are very predictable, and that's one of the most important
things we want in an aerial fabric. While Tricot seems to be the most
popular weave for low stretch fabrics, just about any of the warp knits will
give you the strength consistency and more importantly safety that you need. For
reference, Simply Circus uses a 105 inch wide, 40-denier, tricot weave, 100%
polyester (sorry, I don't have thread count handy). The manufacturer of my
fabrics uses spun PET yarn rated at between 75 and 80 cN/tex.
Q. Has any testing been done on the strength of aerial fabrics?
A. Yes, there has been some testing done, and more is in the works.
- Galvan Wild has conducted extensive material tests. The Circus OZ
testing is not currently available online, however the most recent testing
he has done ("Rip and Tear, Phase 1") is available here
(raw data from those tests is here).
Galvan has more testing planned and under way, we will add links to those
test results as they become available.
- Cypher Zero and FireFly Dance has performed some fairly extensive material
tests, including metered shock loads and pulls, on several kinds of commonly
used fabrics. This data is not online, however Cypher has been
known to share if you ask nicely.
- Cathy Gauch of Aircat Aerial Arts tested the breaking strength of the 100%
polyester knit fabric they use (what others often refer to a super
stretchy). When Cathy Gauch tested the fabric for breaking strength, she
tied it in a slip knot, that was put on to a shackle. It was stretched to
it's max, about 1 - 1.1 tons, twice. On the third time, it started to rip
just below the knot at 1.1 tons (A ton is 2000 pounds, 1.1 tons is
2200 pounds)
- Serenity Smith Forchion of Nimble Arts had pull testing done on 4 fabrics
in June of 2007. Two of the fabrics were low stretch (also called no
stretch) and two were medium stretch.
- The first fabric was a new 114" wide, low stretch tricot fabric,
which broke at 2025 lbs.
- The second fabric was a used (4 years old) 96" wide low stretch
tricot fabric, which broke at 1795 lbs
- The third fabric was a new 60" wide medium stretch interlock
fabric, which broke at 850 lbs. It should be noted that this
sample was not the normal medium stretch interlock fabric they sell.
- The forth fabric was a used 60" wide medium stretch
interlock fabric, which broke at 1310 lbs.
- Aerial Fabrics pull testing done in May
2007 by Phil Servita. Currently, this is the most well-documented
test of aerial fabric publicly available.
Q. In the strength testing that has been done on aerial fabrics, have the
failures been catastrophic?
A. As far as we are aware, none of the strength testing that has been done
has resulted in a single catastrophic failure of the fabric. All of
the testing that we are aware of resulted in significant tearing well before the
fabrics broke.
Q. What are 'fire proof' aerial silks?
A. As of this writing (1/2007), there are no fabrics on the market that are
certified as fire proof, nor are there any products on the market that can make
a fabric fire proof. If a fire gets hot enough all fabrics will burn or
melt (including synthetics). The best you can do in terms of making
your aerial silks safer in a fire is to make them flame retardant.
Q. What do I need to know about fire retardants?
A. Fire retardants are chemicals that make it harder for a fire to burn.
Most synthetic materials have fire retardants mixed in during manufacturing,
while other materials will need to have them added later. These retardants
give you more time to get out of danger before the materials its applied to goes
up in flame. As an aerial performer, you will, from time to time, run into
situations where you need use and prove that that you are using aerial silks
that have been treated with a fire retardant.
Q. OK, I need to prove my silks are fire retardant. How can I do
this?
A. Some jurisdictions (such as NY and CA) require you to obtain official
certificates from either the manufacturer of the fabric, or from a certified
fire retardant treatment company. Most jurisdictions will accept end-user
treatment records. If you foresee this as being an issue, the easiest
thing to do is to ask your aerial silks vender for a certificate of flame
retardancy when you purchase new silks. Be aware that most silks vendors
are distributors, and will likely need to obtain these from the manufacturer
before they can give them to you.
Q. Are the silks I bought already flame retardant?
A. Since most aerial silks in common use today are made from synthetics,
they very well could be. You should ask your vendor about this.
Q. My silks are not currently fire retardant or I can't prove that they
are. What can I do?
A. Your only options are to (1) buy new silks with the fire retardant
certificate, or (2) treat the silks with a chemical retardant. Depending
on where in the world you are, you may be able to treat it yourself, or you may
need to hire a company to treat it for you.
Q. What do I need to know about treating these myself?
A. Because of how silks are used, you need to use a fire retardant chemical
that can be in constant direct contact with the skin. In general you
should look for a class 1 flame retardant spray that specifically lists
'Bedding' or 'Clothing' as an approved area of application (note: some chemicals
list 'mattresses,' this is not the same as 'bedding.')
If you treat the fabrics yourself, the following tips should be helpful:
- MAKE SURE YOU READ AND UNDERSTAND THE LABEL BEFORE APPLYING IT TO
ANYTHING!
- Make sure you apply these chemicals in a well-ventilated area
- Use proper protection when applying these chemicals (chemical gloves,
water proof boots, chemical mask, eye protection, long sleeve clothing,
etc.)
- Do the math. The label will tell you how to calculate the amount of
product needed for the size of your fabric. Make sure to do the math,
and use the amount of product the label says to use.
- LET THE FABRIC AIR DRY COMPLETELY AFTER TREATING THEM
- All fire retardant products will make the fabric a bit stiff, kind of like
if you had added starch when you washed them. The best way we have found to
counter this is to place the fabrics in a dryer on tumble only (no heat), or
on the lowest heat setting the dryer has, and allowing the fabrics to tumble
until it is soft again. This should not have any effect on the fire
retardant. MAKE SURE THE FABRICS ARE COMPLETELY DRY BEFORE DOING THIS!
- Make sure you document what you used, when you used it, how much chemical
you used, how you applied the chemicals to the fabrics, and when you expect
to have to reapply treatment (usually once every 2 years).
- Some of these products also include a list of things to watch for with
treated fabrics. These watch list items should be added to your
regular inspections of the fabrics.
Q. What do I need to know about having a company treat these for me?
A. Because of how silks are used, you need to make sure they use a fire
retardant chemical that can be in constant direct contact with the skin.
The chemical they use should be a class 1 flame retardant that specifically
lists 'Bedding' or 'Clothing' as an approved area of application.
If you have a company treat the fabrics for you, the following tips should be
helpful:
- Make sure you get all of your paper work. This includes a
certificate of treatment, a service slip or receipt with the chemicals used,
and copies of both the MSDS sheet and specimen label for the chemical they
used. You should keep all of these for your records.
- Make sure the service slip or receipt they give you lists the chemical
they used, and the amount of the chemical they used.
- Check there math. The label will tell you how to calculate the
amount of product needed for the size of your fabric. Do the math
yourself, and check that against the amount of product they actually used.
- All fire retardant products will make the fabric a bit stiff, kind of like
if you had added starch when you washed them. If the treatment company does
not tumble the fabric for you, you should tumble it yourself (see the
section on treating the fabrics yourself)
- Some of these products also include a list of things to watch for with
treated fabrics. These watch list items should be added to your
regular inspections of the fabrics.
Q. Do these chemicals affect the strength of the fabrics?
A. Yes, they do. Many of the fire retardant treatments that are in common
use today work because the chemicals that are applied react with the cellulose
of the material they are applied to. It is virtually impossible to have a
chemical reaction of this type without the cellulose being weakened in the
process.
While its extremely difficult to calculate the exact strength reductions
(this will depend on details of the fabric, the chemicals used, the application
and other factors), as a general rule of thumb you can assume that treated
fabrics are about 10% weaker than non treated fabrics.
6.4 Selecting a Web
Q. What are webs?
A. A web is the ropelike apparatus used in various aerial acts, including
Spanish Web, Corde Lisse and Cloud Swings. All
webs have an eye spliced into either one or both ends of the web for rigging
purposes. Some webs have steel cable cores, while most do not.
Q. Where did webs come from?
A. Webs evolved from the rigging ropes used by the early Spanish Web players
(it began as a climbing game played by Spanish sailors as early as the 1300's),
to the modern webs we use today.
Q. What kind of webs are available today?
A. In general, their are two basic kinds of webs to choose from - Braided
Webs (left) and Tubular Webs (right).
Q. How are braided webs constructed?
A. Braided webs are made out of thick (usually 30mm-35mm diameter), strong
(usually rated with a BS n the 7,000# plus range) but soft 8-strand braded rope
with an eye splice done in one or both ends of the web. Because these
ropes are commercially available and the splicing is not too difficult, these
webs are made by many independent riggers, and are also sold by various circus
equipment venders.
Q. How are tubular webs constructed?
A. Tubular Webs were originally made by pulling large numbers of cotton
yarns (the kind ropes are made of) through old textile fire hoses.
Modern webs are still made in much the same way, with rope fibers being
pulled through a textile sheath, however modern webs are made with much better
materials than the early webs were made with (modern cotton webs have a BS in
5,000# range, and synthetic webs can have BS ratings well over 10,000#).
Commercially available tubular webs can be purchased from a number of sources,
though almost all are actually manufactured by the same company. Tubular
webs can also be custom made by some independent riggers. While cotton is still
the most popular material for making tubular webs (almost all commercially
manufactured webs are made of a cotton sheath and a 50/50 cotton poly blend
internal rope), it is becoming more common to find tubular webs made of nylon
and other synthetic materials.
Q. Which kind of web is right for me?
A. That mostly comes down to personal choice. Some people like the feel of
braided webs, while others like the feel of tubular webs.
Q. What's the deal with webs and steel cable cores?
A. The need for steel cable cores in webs is a debate that rages on and off
again in various rigging circles. Early tubular webs were made with less than
deal materials, and needed steel cable cores for basic safety. Modern webs are
constructed with much higher quality materials, and usually don't need cable
cores for general use. At the end of the day, the bottom line is that some
applications require a cable core, but most don't.
Q. What are some examples of situations were I might need a cable core in
my web?
A. In some situations, webs can be exposed to high shock-load forces where
you might want a cable core to take that load. Sometimes you will rig a
web to support another apparatus. For example, you might want to have two webs
supporting a double trapeze. In such a case, you may want the cable core
to help make sure the trapeze bar is always level.
Q. Why wouldn't I want a cable core in my web?
A. Webs with cable cores are harder to wrap around the body, they are harder
to get hold of, they are much more expensive, and they are much harder on the
body of the performer.
7. Inspecting and Maintaining Aerial Apparatus
What follows are very general guidelines for inspecting and maintaining
various pieces of aerial apparatus. These guidelines are NOT a replacement for
the specific maintenance and care instructions that came with your equipment.
7.1 Metal Apparatus (Lyra, Trapeze Bars, etc)
Most metal apparatus, including Lyras and Trapeze Bars, are solid pieces of
equipment that should last a very long time if properly maintained. While the
exact inspection schedule will depend on factors such as the amount of use a
particular apparatus gets and the manufacturers instructions, as a general rule
of thumb a cursory inspections should be made every time the apparatus is put
up, or for fixed installations on about a weekly basis and a full inspection
done on at least a yearly basis.
7.1.1 Cursory inspection
- Remove the apparatus from the rigging
- Check the body of the apparatus for any signs of rust according to the
manufactures instructions.
- If you find rust on the body of the apparatus, you should rub the area
with steel wool to remove the rust.
- If you find rust over a large portion of the unit, or going into an
area covered by padding/fabric, perform a full inspection on the unit.
- Check the welds according to the manufactures instructions.
- Look for any surface flaws of imperfections in the weld.
- Using hand pressure, try and pull and twist the weld.
- If the welded joint fails this inspection, immediately take the unit
out of service and consult the manufacturer.
- Inspect any attached ropes or cables according to the manufactures
instructions.
- If the ropes or cables show any imperfections or signs of excess wear,
perform a full inspection on the unit
- Check the rigging components for signs of excess wear
- If any rigging component shows signs of excess wear, replace the
component
7.1.2 Full Inspection
- Remove the apparatus from the rigging
- Disassemble the unit according to the manufactures instructions
- Remove any grip aids (tape, etc) from the unit
- Remove any fabric coverings and padding from the unit per
manufacturers instructions
- Remove and rigging components (shackles, etc) and ropes / wires from
the unit
- Clean the unit according to the manufactures instructions
- Most metal items can be cleaned using rubbing alcohol and rags
- Make sure to get all grip aid residue off
- Check the body of the apparatus for any signs of rust according to the
manufactures instructions
- If you find rust on the apparatus, you should rub the area with steel
wool to remove the rust
- Check the welds according to the manufactures instructions
- Look for any surface flaws of imperfections in the weld
- Using hand pressure, try and pull and twist the weld.
- If the welded joint fails this inspection, immediately take the unit
out of service and consult the manufacturer
- Inspect any attached ropes or cables according to the manufactures
instructions.
- If the ropes or cables show any imperfections or signs of excess wear,
replace the ropes or cables
- Inspect any rigging components according to the manufactures instructions.
- If the rigging components show any imperfections or signs of excess
wear, replace the components
- Inspect the padding and fabric covers according to the manufactures
instructions.
- If the padding or fabric show any signs of excess wear, replace the
padding and/or fabric
- Check the rigging components for signs of excess wear
- If any rigging component shows signs of excess wear, replace the
component
- Reassemble the unit according to the manufactures instructions.
- This is generally done in the reverse order of how you disassembled it
- Re-tape the unit
7.2 Rope based Apparatus (Spanish Web, Corde Lisse, Cloud Swing)
Most Rope based apparatus, including Spanish Web, Corde Lisse and Cloud
Swings, are durable, long lasting pieces of equipment when properly cared for
and maintained. Webs do need to be replaced as they get worn over time. In
general, and unless otherwise specified by the manufacturer, a cursory
inspections should be made every time the apparatus is put up, or for fixed
installations on about a weekly basis. A full inspection should be done on
at least a yearly basis, and a pull test done once every 1-5 years.
7.2.1 Cursory inspection
- Remove the apparatus from the rigging
- Disassemble all rigging
- Check the body of the web according to the manufactures instructions.
 Check
the outside of the web for tears, cuts and other signs of excess wear on
the web. Hold the web with your hands 6 to 8 inches apart and bend the
web in an inverted "U" as shown. This bending will make it
easier to see any damaged fibers or cuts that may be present.
Inspect entire exterior of the web. Check
the outside of the web for tears, cuts and other signs of excess wear on
the web. Hold the web with your hands 6 to 8 inches apart and bend the
web in an inverted "U" as shown. This bending will make it
easier to see any damaged fibers or cuts that may be present.
Inspect entire exterior of the web.- If the web has any minor tears or cuts in it, or otherwise shows
other signs of excess wear, document the damaged area and increase the
inspection frequency. If the minor damaged area increases in size or you
find major damage replace the web.
- Smell the web
- If the web smells mildly, apply Febreze or another spray on
fabric odor control product to the material to control the smell
- If the odor can not be adequately controlled with a spray on fabric
odor control product, perform a full inspection
- If you smell mold, mildew, or dry rot replace the web
- Check the rigging components for signs of excess wear
- If any rigging component shows signs of excess wear, replace the
component
7.2.2 Full inspection
- Remove the apparatus from the rigging
- Disassemble all rigging
- Check the body of the web according to the manufactures instructions
just as you would do in your cursory inspection.
- Wash the rope according to the manufactures instructions.
- Gently hand wash the straps use as little moisture as possible in the
cleaning process. This moisture will potentially damage the web if not
completely dry.
- Use a mild detergent only (do not use softeners, bleach, etc)
- Allow the web to hang dry - DO NOT use a dryer, and DO NOT hang in
direct sunlight
- Check the rigging components for signs of excess wear
- If any rigging component shows signs of excess wear, replace the
component
- When completely dry recheck the body of the web according to the
manufactures instructions as was done in step 3 and 4 of the cursory
inspection
7.2.3 Pull inspection
Pull tests are tests that are generally conducted by the manufacturer every
few years. The manufacturers generally inspect these units by pulling it
with 1000 pounds for 30 minutes, and performing a more in-depth version of the
full inspection listed above. In general, you should be sending the the swivels
and other rigging components as well so they can be disassembled,
inspected, and (if needed) lubricated.
7.3 Aerial Fabrics
Aerial Fabric needs to be replaced as they get worn over time. In general,
and unless otherwise specified by the manufacturer, a cursory inspections should
be made every time the apparatus is put up, or for fixed installations on about
a weekly basis and a full inspection done on at least a yearly basis. Remember
that using a slip-knot, or using the fabric as a sling is harder on the
material, and you should adjust your inspection schedule accordingly.
7.3.1 Cursory inspection
- Remove the apparatus from the rigging
- Remove the fabric from the Fabric from the Fabric Hanger or Rescue-8
- Check the body of the fabric according to the manufactures instructions.
- Check for tears in the fabric or signs of excess wear
- If the fabric has tears in it, or shows other signs of excess wear,
replace the aerial fabric
- Smell the fabric
- If the fabric smells mildly, apply Febreze or another spray on fabric
odor control product to the material to control the smell
- If the odor can not be adequately controlled with a spray on fabric
odor control product, perform a full inspection
- Check the rigging components for signs of excess wear
- If any rigging component shows signs of excess wear, replace the
component
7.3.2 Full inspection
- Remove the apparatus from the rigging
- Remove the fabric from the Fabric from the Fabric Hanger or Rescue-8
- Check the body of the fabric according to the manufactures instructions.
- Check for tears in the fabric or signs of excess wear
- If the fabric has tears in it, or shows other signs of excess wear,
replace the aerial fabric
- Wash the fabric according to the manufactures instructions.
- Use a front-loading machine if possible
- Use detergent only (do not use softeners, bleach, etc)
- Allow the material to hang dry - DO NOT use a dryer
- Check the rigging components for signs of excess wear
- If any rigging component shows signs of excess wear, replace the
component
- Recheck the body of the fabric according to the manufactures instructions.
- Check for tears in the fabric or signs of excess wear
- If the fabric has tears in it, or shows other signs of excess wear,
replace the aerial fabric
7.4 Straps
Straps need to be replaced as they get worn over time. In general, and unless
otherwise specified by the manufacturer, a cursory inspections should be made
every time the apparatus is put up, or for fixed installations on about a weekly
basis and a full inspection done on at least a yearly basis.
7.4.1 Cursory inspection
- Remove the apparatus from the rigging
- Disassemble all rigging
- Check the body of the strap according to the manufactures instructions.
- Check
both sides of each strap for tears, cuts and other signs of excess wear
in the strap. Hold the webbing with your hands 6 to 8 inches apart and
bend the webbing in an inverted "U" as shown. This bending
will make it easier to see any damaged fibers or cuts that may be
present. Inspect one side, then turn the strap over and inspect
the other side. Repeat with the second strap.
- If the straps have any tears or cuts in it, or otherwise shows other
signs of excess wear, replace the straps.
- Smell the straps
- If the straps smell mildly, apply Febreze or another spray on fabric
odor control product to the material to control the smell
- If the odor can not be adequately controlled with a spray on fabric
odor control product, perform a full inspection
- Check the rigging components for signs of excess wear
- If any rigging component shows signs of excess wear, replace the
component
7.4.2 Full inspection
- Remove the apparatus from the rigging
- Disassemble all rigging
- Check the body of the strap according to the manufactures instructions
just as you would do in your cursory inspection.
- Wash the straps according to the manufactures instructions.
- Gently hand wash the straps
- Use a mild detergent only (do not use softeners, bleach, etc)
- Allow the straps to hang dry - DO NOT use a dryer, and DO NOT hand in
direct sunlight
- Check the rigging components for signs of excess wear
- If any rigging component shows signs of excess wear, replace the
component
- Recheck the body of the straps according to the manufactures instructions
as was done in step 3.
8. Rigging
8.1 General Rigging Questions and Theory
Q. Will reading FAQ make me a qualified rigger?
A. No!! If you even think it will, stop reading this FAQ now before you kill
someone!
Q. What process does a rigger use to figure out how to rig something?
A. How an individual rigger does this varies from rigger to rigger, however
most professional riggers use a process known as "Weak
Link Analysis" (WLA for short) whenever they design, build or rig any
sort of aerial rigging. WLA is the process of systematically examining each and
every component of a rigging setup to find the weakest link. Once identified,
the rigging is designed and built with that weakest link in mind, and with the
desired safety factor.
While this sounds like a simple process, it is not. Many factors can make
rigging even simple effects a very complex task. Riggers will often have to
combine components that are designed, measured and tested in the SI system
(metric system), with components that are designed, measured and tested in
English units. Some components will have a working load limit and an ultimate
load limit. Some will only include a working load limit, and other only a mean
breaking strength (MBS). Then you might have to get into the reductions required
by manufacturer specifications for angular loading, additive loads, bending
around sheaves, as well as termination efficiency. All of this adds up to a very
complicated process.
Q. What is a "Shock Load"?
A. A shock load is defined as the sudden and rapid application of force
placed on the rigging. In aerial arts, shock loads are fairly common, and can be
caused by performing skills such as drops.
The formula for computing the minimum shock load is: Shock Load = [(W x Df) /
Ds] + W, where Df is the freefall distance, Ds is the stopping distance, and W
is the weight of the falling object.
For example, lets say we have a a 220 pound (~0.98kN) silks artist that does
a 9 foot free fall and then suddenly stops over a 3 foot distance. Applying our
formula, we get:
| Shock Load=[(W x Df)/Ds]+W |
| 880lbs=[(220lbs x 9 feet)/3 feet]+220lbs |
As you can see, this gives us a minimum shock load of 880 (~3.91kN) of force
on the rigging (at about 4g's)
Q. I have been told that I should have at least a 10:1 safety ratio. What
does that mean?
A. There are two very different answers to this question. A safety ratio can
be calculated using either the equipments normal load (more common), or its
potential shock load (less common). When using a normal load, the safety ratio
is the ratio between the normal expected load of the equipment, and the breaking
point of the weakest point of the rigging. When using the shock load, the safety
ratio is the ratio between the largest expected shock load a rig is expected to
take, and the breaking point of the weakest point of the rigging. To put this in
perspective, we will take a brief look at rigging aerial silks.
As discussed in the last question on shock load, in theory, a 220 pound
person (~0.98kN) could put 880 pounds (~3.91kN) of force on the rigging. Various
load testing has shown aerial fabric to have a breaking load of about 1.1 tons
(2,200 pounds or 9.78kN). Our rescue-8 has a MBS rating of 10,000 pounds
(44.48kN). Our carabineers are MBS rated at 72kN (~16,000 pounds) , and our
swivel MBS rated at 36kN (~8,000 pounds). We will assume an aerial mount point
with a MBS rating of 2 tons (4,000 pounds)
| Component |
kN |
Pounds |
Safety ratio
(normal) |
Safety Ratio
(shock load) |
| Mount point |
17.79kN |
4,000lbs |
18:1 |
4.5:1 |
| Carabineers |
72.00kN |
16,000lbs |
72:1 |
18:1 |
| Swivel |
36.00kN |
8,000lbs |
36:1 |
9:1 |
| Carabineers |
72.00kN |
16,000lbs |
72:1 |
18:1 |
| Rescue 8 |
44.48kN |
10,000lbs |
45:1 |
11.3:1 |
| Fabrics |
9.78kN |
2,200lbs |
10:1 |
2.5:1 |
As you can see from the chart above, the weakest link here is the fabric
itself, with only a 10:1 safety ratio, followed by the mount point with an 18:1
ratio. This means that the normal safety ratio for our aerial silks is 10:1,
with a weight limit of 220 pounds. Our shock load safety ratio for our silks is
2.5:1, with a weight limit of 220 pounds.
- "For a 220 (~0.98kN) pound aerialist to do something on a silks
setup that would cause them to produce 2,200lbs (9.78kN) of force on the
fabrics, that performer would experience the equivalent of 10g's of force -
more than enough to cause blackout and possibly internal injuries before the
equipment would give away." -Chris Clark
- "For a 140 pound (~0.62kN) person to produce the same 2,200lbs
(9.78kN) of force on the fabrics, that performer would experience the
equivalent of 15.66g's of force - more than a fighter pilot experiences
during an ejection - before reaching the breaking point on the fabric. It
should be noted that the military will only allow pilot's to experience such
eject force twice before grounding them permanently." -Chris Clark
The best advice is to make sure that you know and understand what safety
factor your rigging is designed and built with, and make sure that you
understand what the week points in your rigging are. Whenever in doubt, check
with your own qualified rigger!
Q. What safety ratio should I design my rigging to have?
A. In general, you want at least:
| Who |
For What |
Safety ratio
(normal) |
| General Public |
Systems designed to be used by a member of the public,
including youth circus participants, should be rigged at a 10:1 or
greater safety ratio. |
10:1+ |
| Heavy use |
Heavy use systems can be used with confidence in both the
strength and the longevity of the equipment. Thorough and
regularly scheduled inspections of the equipment are, as always,
essential to safe use.
Systems that take significant shock loads, are not easily expendable,
or are not easily inspected should be designed to at least this range of
safety ratios.
|
5:1 - 10:1 |
| General use by trained Aerialists |
System that are built in this safety range can generally
be used over and over again with reasonable variations in movement as
long as the force put on the system is not significantly increased or
altered from how the rig is designed to operate.
Equipment in this range require frequent, regularly scheduled
inspections with immediate replacement of parts that are suspected of
excess wear.
|
3:1 - 5:1 |
| Static Equipment or Limited supervised use. |
Any system created or built with a safety factor in the
2:1 - 3:1 range should only be used for static equipment, or done for a
very specific function. Any rigging done in this range must not be
used in any way for which it is not specifically intended.
Any time such a rig is used to support a performer the rig must be
under constant observation by someone who understands the forces, nature
and tolerances of the system.
|
2:1 - 3:1 |
| Highly trained professionals |
Effects rigged in this range leave almost no margin for
error, and should only be rigged by experienced professional riggers,
and flown by highly trained personnel.
As a general rule, any time you have an effect rigged within this
safety range, it should be viewed as a one time only stunts or effect,
requiring a complete inspection of all components before and after each
use.
When you have a system with this low of a safety factor, the people
using this system (including others put at risk by this system) MUST be
both willing and able to assume responsibility for the very significant
risk they are taking, including the dangers of potential failure.
|
1:1 - 2:1 |
Q. Should I use the rated strength or the breaking strength when assessing
my rigging?
A. You should always use the breaking strength. In the world of circus
rigging, we often use parts that are designed for other industries. In the
worlds of sailing, theatre rigging and construction rigging (among others),
manufacturers will often give a load rating and not a breaking strength.
In circus rigging, you should convert all rating to a mean breaking strength if
possible.
Q. Why do manufacturers give a safe working load, and not a breaking
strength?
A. Depending on the industry the equipment is coming from, they can do this
for one of many reasons, but most often it is to comply with OSHA
code. Other reasons include sales reasons (such as giving a little in the
safety margin in order to round up the rated load), or competitive reasons (not
wanting a competitor to know exactly how strong a component is)
Q. What does OSHA say about safety factors?
A. OHSA code was, and is, written for equipment that is built for general
use by any person. Unfortunately this means that OSHA does not have standards
that are directly applicable to circus rigging (or theater rigging).
However, throughout most of the various OSHA rigging standards (material
handling standards, Hoisting and rigging standards and Maritime standards), a
5:1 safety ratio is recommended for non human loads and a 10:1 safety ratio for
human loads. These ratios do make for a good starting point for circus
rigging, however you do need to look at your forces to determine what your
safety factor should be..
8.2 More on Weights and Measures
One of the difficulties with rigging circus apparatus is that we end up using
rigging components from many different industries, almost none actually designed
for how we use them. Some equipment uses the S.I. system, where weight is often
expressed in kilograms (a mass), newtons (a force) and kilonewtons (a force with
mass) . Other use the English system, where weight is expressed in pounds (a
force with mass).
When dealing with rigging components, it is often helpful to convert
everything to use one numbering system or the other. If you are currently
connected to the net, a convenient web conversion utility is available online
at: http://www.pitt.edu/~rsup/forceconv.html
If you are not currently connected to the net, or if you want to know how to
make the conversions yourself, the following charts may help you make the
conversions (or just confuse you further):
| Pounds, Newtons and Kilograms |
| To Convert From |
Multiply by |
to get / To Convert from |
multiply by |
to get |
| pounds lb |
4.44822 |
Newton, N |
0.224809 |
lb |
| lb |
0.453592 |
kg |
2.20462 |
lb |
| N |
0.101972 |
kg |
9.80665 |
N |
| lb |
0.0310 |
slug (lb-s2/ft) |
32.2 |
lb |
| Weight Density (force/volume); including
kilogram force |
| To Convert From |
Multiply by |
to get / To Convert from |
multiply by |
to get |
| lb / ft3 |
0.157087 |
kilonewtons per kN/m3 |
6.36590 |
lb / ft3 |
| lb / in3 |
271.447 |
kN/m3 |
0.00368 |
lb / in3 |
| lb / in3 |
0.000578703 |
lb / ft3 |
1728 |
lb / in3 |
| N / m3 |
0.101972 |
kg / m3 |
9.80665 |
N / m3 |
| kN / m3 |
101.972 |
kg / m3 |
0.0090665 |
kN / m3 |
| lb / ft3 |
16.0185 |
kg / m3 |
0.0624279 |
lb / ft3 |
| Mass Density (mass/volume) |
| slug / ft3 |
515.379 |
kg / m3 |
0.0019403 |
slug / ft3 |
8.3 Rigging Components
- Note: For purposes of this FAQ, the term "Rigging
Components" is defined as the commercially available connecting
devices, tension devices, pulleys, swivels, cables, ropes, ascenders,
decsenders and other related parts. When you get deeper into aerial rigging,
you will find this term has a much wider meaning than is used in this FAQ.
We may eventually expand this to include this wider definition, however for
the moment that is outside the scope of this FAQ.
The world of rigging is vast, and constantly changing. For specific product
recommendations, or answers to your specific needs, you should consult your
rigging vendor or your own qualified rigger.
8.3.1 Choice in Materials
Q. Should I use Aluminum or steel components?
A. The basic choices for most rigging components does come down to either
Aluminum or Steel. This is a debate that rages on and off again. The general
consensus among riggers seems to be that when ever possible, use steel.
This doesn't mean that aluminum is never used - quite the contrary, it is
used fairly often - but it does mean that when you use aluminum, you do so
knowingly and only when it really is the best tool for the job.
Q. Why is steel preferred over aluminum?
A. It all comes down to the ductility of the material. A steel component
will deform before failing, while aluminum is far less forgiving and will fail
with little warning.
Q. Should I use rated aluminum, or un-rated steel?
A. Thats a tricky question. A qualified rigger will make this choice
depending on a huge number of factors. If you are not a qualified rigger,
your usually best off sticking with rated hardware.
Q. What is a retirement plan?
A. With any metal components, you should have and follow a retirement plan
for each piece of equipment that is appropriate for the equipment, and its
usage. When in doubt, contact a professional rigger.
8.3.2 Choice of Components
Q. What are all of the different rigging components that are commonly
used?
A. The list of available rigging components, and all of the specific
variations that are available is endless, however some of the more common
rigging components include:
- Anchors (forged eyebolts, rigging cleats, beam clamps, etc)
- Connectors (screw lings, carabineers, shackles, etc)
- Swivels (sealed baring, unsealed baring, no baring)
- Span sets (wire rope, rope, webbing, endless, lanyards, etc)
- Pulleys
- Friction devices (Ascenders, Descenders, 8's, etc)
- Rigging Plates (bear claws)
- Tension devices (turnbuckles, come-a-longs, cable pullers, ratchet straps,
etc)
- Ropes
- Wire Rope
8.3.2.1 Anchors
Q. What is an anchor?
A. In the world of aerial rigging, anchors are defined as anything that
attaches rigging to the environment by either permanent or temporary
means.
Q. How is an anchor point different than an aerial point?
A. Aerial points refer specifically to anchor points that are overhead and intended
to take the load of an aerial performer.
Note: See section 8.4 for discussions of aerial points
8.3.2.2 Connectors
Q. What is a connector?
A. Connectors are pieces of equipment used to connect one piece of rigging
to another. The most common connectors used in rigging are Carabineer,
Shackles
and screw links. Carabineers are a metal loop with a sprung or screwed gate.
These devices can quickly and reversibly connect components in rigging, such as
ropes to aerial apparatus. Shackles are pieces of metal, closed with a pin
across the end. These devices are used for securing parts of the rigging to each
other. Shackles come in many shapes and sizes, including D-shackles,
Bow-shackles, Web-shackles, and many other variations. Shackles are generally
used for more permanent rigging of components. Screw links are another
commonly used connector. Screw links are often smaller than carabineers or
shackles, however its easier to miss a loose gate on a screw link.
The following picture contains examples of common carabineers (left),
shackles (right) and screw links (center)
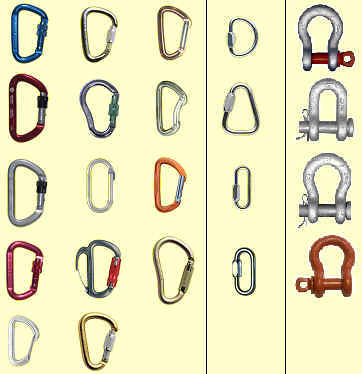
8.3.2.3 Swivels
Q. What are Swivels?
A. Swivels are rotating fittings that is used to keep a line from tangling,
or used to allow a section of the rigging to spin freely. There are a great many
types of swivels in use.
Q. I have heard that I need to add graphite to some rescue swivels.
How does that work?
A. In the world of aerial arts, we use sealed and unsealed rescue swivels.
Sealed swivels do not need to have graphite added at regular intervals, however
unsealed rescue swivels do need it. 
Q. The paperwork that came with my Petzl swivel says it need to be oiled
as part of its regular maintenance. Can you tell me about
that?
A. Petzl Technical Notice P58S and P58L both contain the diagram on the rght,
which does indeed indicate that these swivels should be lubricated on a regular
basis.
Q. How should lubricate my Petzl swivels?
A. We have written to Petzl to clarify how this procedure should be
done. We will post more information here when it becomes available.
Q. How do I add graphite to an unsealed swivel?
A. The swivel pictured here is a Mad Rock rescue swivel, however the
procedure is the same for any unsealed swivel. Start by finding the swivel
head (see middle photo) - this is usually on the bottom of the swivel.
Apply a liberal amount of graphite lubricant (available from your local
locksmith) around the seam in the center of the swivel as shown in the second
photo. Turn the swivel both clockwise and counter-clockwise until all of
the graphite has entered the swivel and the swivel turns freely. This
procedure should be preformed both as needed (any time your unsealed swivel
shows signs of slowing down) and on a regularly scheduled basis (how often
depends on use - we do ours monthly) [Note: Consult your swivels
manufacturer for details about your swivel and its maintenance. If your
manufacturer says something different than we do, go with what they said.]
8.3.2.4 Span sets
Span sets come in many forms - wire rope, rope, webbing, endless, lanyards,
etc. Each of these have their own advantages and
disadvantages.
8.3.2.5 Pulleys
8.3.2.6 Friction devices
(Ascenders, Descenders, 8's, etc)
8.3.2.7 Rigging Plates (bear claws)
8.3.2.8 Tension devices (turnbuckles, come-a-longs, cable pullers, ratchet
straps, etc)
8.3.2.9 Ropes
8.3.2.10 Wire Rope
Q. What are Tension Devices?
A. Tension Devices are used to apply and hold tension to rigging. The most
common tension devices are Turnbuckles,
Come-alongs
and Ratchet
Straps. Turnbuckles are perhaps the most common tension device used in
aerial rigging. A turnbuckle normally consists of two threaded eyelets that are
screwed into each end of a small metal loop. One eyelet has a left-hand thread
and the other has a right-hand thread. This allows the tension to be adjusted by
rotating the loop, which causes both eyelets to be screwed in (or out), raising
or lowering the tension. Turnbuckles are most commonly used in applications
which require a great deal of tension. Come-a-longs are a common tension device
used in aerial rigging. A come-a-long normally consists of a ratchet wheel
attached to a drum coiled with aircraft cable. When the ratchet is turned,
tension is applied to the aircraft cable. Come-a-longs are commonly used in
applications which require a great deal of tension. Ratchet Straps are another
common tension device used in aerial rigging. Ratchet Straps consist of a small
ratchet wheel attached to a small, slotted drum. A nylon strap is pulled through
the slots in the drum until it is tight. The ratchet is then turned to apply
additional tension on the strap. Ratchet straps are fast and easy to use,
however the generally do not apply as much tension as Come-a-longs or
turnbuckles.
Q. What are friction devices?
A. Friction devices are equipment designed to put friction into rigging.
How much friction you need, and how you need that friction applied can vary
greatly. Common friction devices include break bars (top row), figure 8's
(bottom left), belays, and other such devices. It should be noted that
most connectors can be used in various ways to apply friction to rigging as
well.
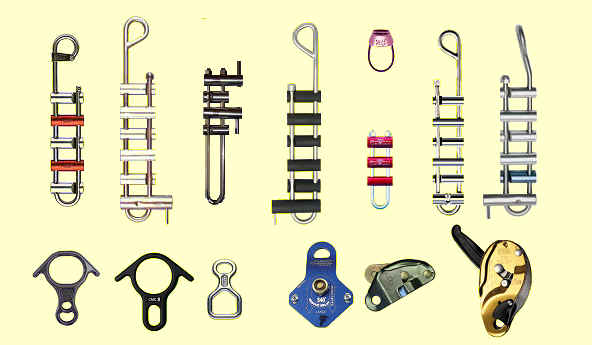
Q. What do I need to know about steel cable?
A. Steel cable comes in many configurations, each with its own strengths and
weaknesses. The following notes should be of use when choosing cable.
 The
most common form of steel cable is braided steel cable, most commonly referred
to as "Wire Rope." Wire Rope comes in both stainless steel and
galvanized steel. A protective vinyl sheath is often added to
the finished wire rope, with the resulting product known as "Aircraft
Cable". The
most common form of steel cable is braided steel cable, most commonly referred
to as "Wire Rope." Wire Rope comes in both stainless steel and
galvanized steel. A protective vinyl sheath is often added to
the finished wire rope, with the resulting product known as "Aircraft
Cable".
Wire Rope is generally referred to as two sets of numbers, corresponding to
the overall diameter of the cable, and the construction of the cable. Common
configurations include:
|
Size
|
Const. |
|
3/32"
|
7x7
|
|
1/8"
|
7x7
|
|
3/16"
|
7x19
|
|
1/4"
|
7x19
|
| 1/2" |
7x19 |
Wire rope is constructed by wrapping individual wires into bundles, each
bundle having either 1, 7 or 19 wires per bundle (this is the second number in
the 7x19 number above). Several bundles are then taken and wound together
to form the final cable (typically 7, this is the first number in the 7x19
number).
8.3.3 Knots, hitches and splices
Q. What knots commonly used in rigging?
A. The short answer is that you use whatever knot safely gets the job done.
The longer answer is that their are a large number of knots commonly used in
rigging. Wikipedia has a good List
of knots
Q. Do knots reduce the strength of the rope?
A. Yes. When you have a knot in a rope, and energy is then applied to the
rope, that energy, which is normally spread over the entire length of the rope,
directs itself to the knot, causing a reduction in the strength of the rope.
The general rule of thumb is to assume that any knot will not reduce the rope's
ultimate strength by about 50%. It should be noted that in some cases a
knot can reduce the ultimate strength of a rope by more than 50%. The
following chart gives approximate strength reduction factors for various types
of knots:
Knot
|
Reduction %
|
|
Bends
|
| Double Fisherman's Knot |
21%-45% |
| Figure 8 bend |
19%-50% |
| |
|
|
Loops
|
| Figure 8 loop (with a bight) |
20%-45% |
| Figure 8 loop (follow through) |
19%-45% |
| Figure 9 loop |
9%-30% |
| Inline Figure 8 loop |
25%-50% |
| Butterfly Knot |
25%-50% |
| Bowline |
33%-50% |
| Overhand loop (with a bight) |
15%-50% |
| Overhand Double Loop |
26%-50% |
| |
|
| Knots in Web |
| Overhand Loop |
35%-50% |
| Water Knot |
36%-50% |
| Figure 8 loop (with a bight) |
30%-50% |
| Figure 8 loop (follow through) |
26%-50% |
You should also keep in mind that many other factors can also reduce the
breaking strength of a given rope. For example, when a rope is run over a
carabineer with a diameter of 10 millimeters, it is approximately 30 percent
less than the maximum breaking strength. Smaller diameter carabineers will
reduce the strength even further.
Q. Does the type of rope affect the strength reduction for different
knots?
A. Yes, it does. The following chart (reprinted here with
the permission) is from an article by David Schmidt in the February, 2007
edition of Sail Magazine discussing how different knots reduce the strength of
different types of rope. I will note that in all cases, splicing was
still the best method.

(Click on above image for a larger version.)
Another article worth reading is Knot
Break Strength vs. Rope Break Strength by Dave Richards, Technical Director
of the Cordage Institute. This article documents the process and results
from the Cordage Institute Technical Committee 2004 study on knot efficiency.
Q. What are the common techniques for splicing?
A. The most common splices are the eye splice ( Eye
splice.gif ) and the rope splice ( Rope
splice.gif ). [Note: also see the Splicing
Guide from New England Ropes]
Q. What should I know about knots and bungee?
A. The following issues come up a lot in regards to bungee:
- Because of stretch ability of bungee, it can be difficult to tie secure
knots with bungee (see next question on what knots to use)
- Whenever you use bungee, you should make sure to leave enough tail in case
of slippage
- You should consider putting witness marks on the knot to allow easier
visual inspections
- You generally want to make sure the bungee is backed up by something that
is not bungee.
Q. What knots can you use with bungee cord / shock cord?
A. The following knots are known to hold in bungee cord:
8.4 Questions About Aerial Rigs and Mount Points
The construction of aerial rigs and mount points is best left to professional
riggers and engineers. The following questions and answers may help you, or just
further confuse you depending on your situation.
Q. How much weight should a mount point be able to take?
A. You should consult a professional rigger to determine what your specific
needs are for an aerial mount point, however the general consensus seems to be
that an aerial mount point should be rated for a breaking load of around 1 - 2
tons. Again, this is very dependant on your individual situation and you should
consult your own qualified rigger for specific answers.
Q. What can I use as an aerial mount point?
A. The short answer is that you can use anything your qualified rigger tells
you that you can use. The following should give you some very general ideas of
things within your space to look at and think about before you call your rigger,
or more specifically, things you should ask them about.
- Freestanding Aerial Rigs. Freestanding aerial rigs are an excellent
way of getting a mount point where you otherwise wouldn't have one. For a
review of the current (2006) state of commercially available freestanding
aerial rigs, read the following article from CircusNews.com reviewing the
various rigs available: http://www.circusnews.com/modules.php?name=News&file=article&sid=2452,
and http://www.circusnews.com/modules.php?name=News&file=article&sid=2779
- Wooden beams. Large wooden beams, such as those commonly found as
structural members of mill buildings and barns often make excellent mount
points. Depending on the situation, your rigger may choose to attach
eyebolts to the beam, use a span set, anchor strap or other device to wrap
around the beam or use another method to attach a mount point to the beam.
- Steel I beams. Steel I beams, such as those commonly found as
structural members of many commercial buildings often make excellent mount
points. Depending on the situation, your rigger may choose to attach
eyebolts to the beam, use a span set, anchor strap or other device to wrap
around the beam, attach a beam clamp to the beam, or use another method to
attach a mount point to the beam.
-
- Concrete beams and celings. Reinforced concrete structures
can be rigged to by either padding and slinging the beams, or by using an appropriately
rated concrete anchor, such as a drop-in anchor. The last option for
rigging to concrete is the use of an appropriately rated epoxy to secure
forged eye bolts to the concrete itself. When using an epoxy, it must
be designed for concrete, and rated for the expected load. The
concrete structure itself also needs to be able to take this force, take it
in the location its being applied and transfer the force to the ground
without adversely effecting the structure. Attaching mount ponts to
concrete with an anchor or with epoxy should only be done by riggers trained
and experienced in the use of these products.
-
Q. OK, I need a rigger. What is the going rate for professional riggers?
A. The rates vary depending on a number of factors, however at the time
of this writing (2006) a rough ballpark is $30 - $75 an hour, plus any costs
involved in getting them to the job and actually doing the job.
8.5 Questions About Rigging Specific Apparatus
- The following is presented for your general information only. Always
consult and follow the manufacturers directions for specific advice on the
use and rigging of your equipment. And remember, if you have questions about
your specific situation, consult a qualified rigger.
Q. What is the minimum ceiling height for rigging aerials?
A. That depends on what you want to accomplish. There are people who
successfully manage to do high level static trapeze, Lira, Spanish web (etc.) in
facilities with only a 12 foot ceiling high.
First, you need to decide how high you want the apparatus to be. At this
height, do you have enough room above and below the apparatus to do what you
need to do?
Many aerial arts do not have to be high off the ground to be effective or
wonderful to watch or participate in as a physical activity.
Q. I have a question about rigging something that is not in this FAQ. Who can
I call?
A. Call your own qualified rigging expert with any questions you have. This
FAQ is not a replacement for a qualified expert!
8.5.1 Aerial Hoop / Lyra
Q. What is the basic method for rigging an Aerial Hoop / Lyra?
A. The following Aerial
Hoop basic rigging diagrams should help:
8.5.1.1 Rigging Diagram - Single Tab
Mount point        Mount point
|                  |
Carabineer          Carabineer
|                  |
 Rope              Swivel
|        or        |
Carabineer          Carabineer
|                  |
Swivel             Rope
|                  |
Carabineer          Carabineer
|                  |
Lyra               Lyra
8.5.1.2 Rigging Diagram - Double Tab, Single Point, Spinning
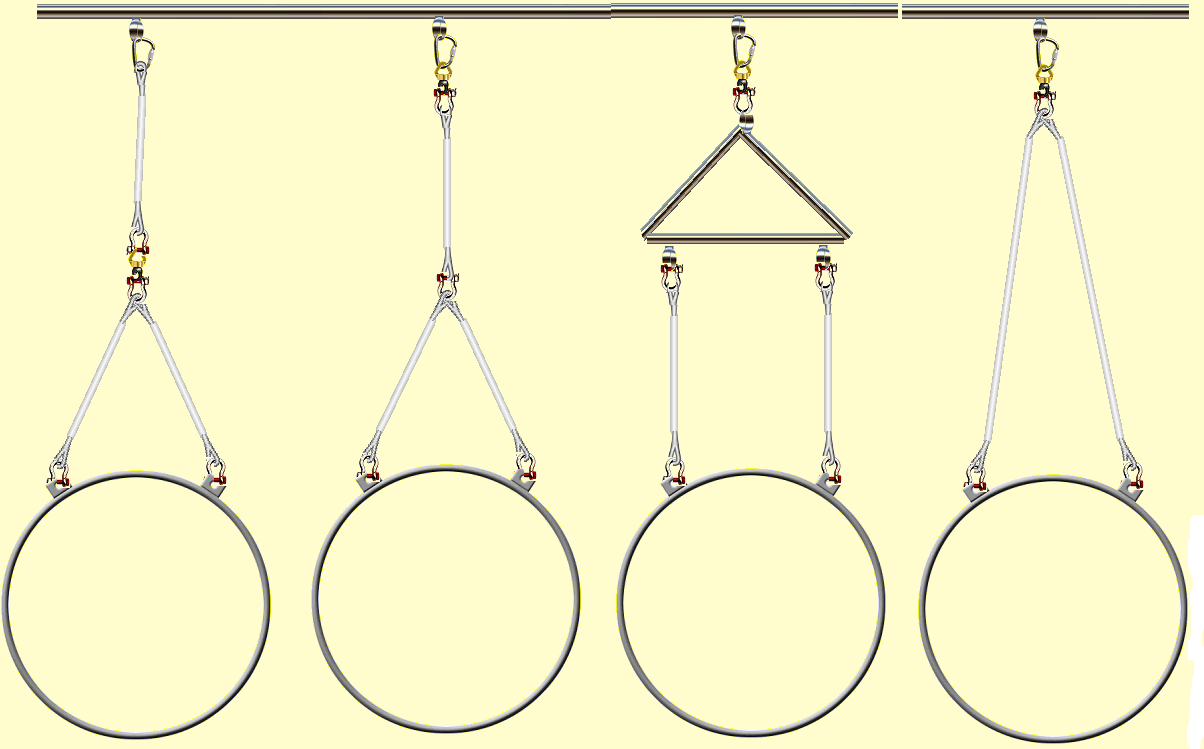
8.5.1.3 Rigging Diagram - Double Tab, Single Point, Non-Spinning
Mount point                Mount point
|                          |
Carabineer        or        Carabineer
/       \                      |
Rope       Rope              Spreader Bar
|           |               /          \
Carabineer   Carabineer     Carabineer  Carabineer
\           /               |          |
Lyra (two tabs)            Rope        Rope
                            |          |
                            Carabineer Carabineer
                            |          |
                           Lyra (two tabs)
8.5.1.4 Rigging Diagram - Double Tab, Two Points, Non Spinning
Dual Mount Points
|             |
Carabineer     Carabineer
|             |
Rope          Rope
|             |
Carabineer     Carabineer
|             |
Lyra (two tabs)
8.5.2 Aerial Fabrics
Q. How do I attach my silks to my rescue-8?
A. For detailed instructions on how to attach your silks to a Rescue-8,
consult the instructions that came with your silks. For your convenience, here
are the instructions from a few different vendors:
Q. What is the basic method for rigging Aerial Fabrics?
A. The following Aerial
Silks basic rigging diagrams should help:
8.5.2.1 Rigging Diagram
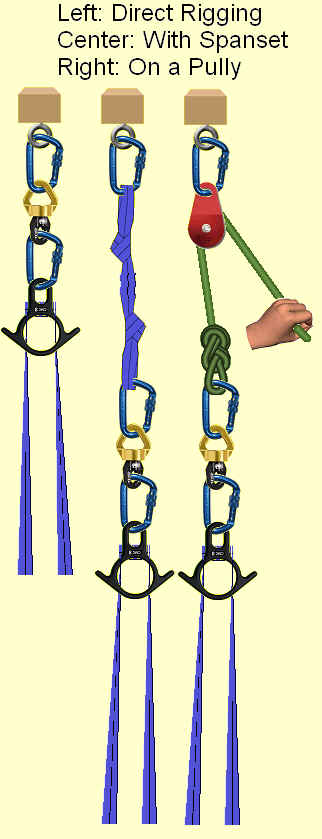
8.5.3 Cloud Swing
Q. What is the basic method for rigging a Cloud Swing?
A. A Cloud Swing can be rigged using a single mount point, or (more
commonly) two mount points. The following Cloud
Swing basic rigging diagrams should help:
8.5.3.1 Rigging Diagram - Single Mount Point
Mount point
|
Carabineer
/         \
Swivel      Swivel
|           |
Carabineer   Carabineer
\           /
Cloud Swing
8.5.3.2 Rigging Diagram - Double Mount Points
Mount point      Mount point
|                |
Carabineer        Carabineer
|                |
Swivel           Swivel
|                |
Carabineer        Carabineer
\            /
Cloud  Swing
8.5.4 Corde Lisse / Spanish Web
Q. What is the basic method for rigging a Corde Lisse / Spanish Web
A. Rigging a Corde Lisse and a Spanish Web is virtually identical. The
following rigging diagram may help:
8.5.4.1 Rigging Diagram
Mount point
|
Carabineer
|
Swivel
|
Carabineer
|
Corde Lisse or Spanish Web
8.5.4.2 Attaching Hand Loops
Q. How do I attach a hand loop to my web?
A. The following diagrams detail the method of attaching a hand loop to a
web:
Q. I have heard that I can use a pruisk knot to attach a hand
loop. How does that work?
 A. Pruisk knots are friction knots designed for attaching a smaller rope to
the side of a larger one. This knot works exceptionally well to attach a
nylon or polyester cord (such as 5mm Tech cord) to a web. Your hand loop
can then be attached to the loop of the pruisk knot (as shown in the picture on
the right - click on it for a larger image), or you can use it to put a
swivel between the web and the hand loop. Advantages of this method
include ease of attachment and easy repositioning of the hand loop along the
web. The big disadvantage of this method is that the pruisk needs to be
inspected before each use.
A. Pruisk knots are friction knots designed for attaching a smaller rope to
the side of a larger one. This knot works exceptionally well to attach a
nylon or polyester cord (such as 5mm Tech cord) to a web. Your hand loop
can then be attached to the loop of the pruisk knot (as shown in the picture on
the right - click on it for a larger image), or you can use it to put a
swivel between the web and the hand loop. Advantages of this method
include ease of attachment and easy repositioning of the hand loop along the
web. The big disadvantage of this method is that the pruisk needs to be
inspected before each use.
Q. How do you tie a pruisk knot?
A. The following diagram may help:
8.5.5 Hair Hang
Q. What is the basic method for rigging a Hair Hang?
A. There are many ways a hair hang can be rigged. The following Hair
Hang basic rigging diagram should help:
8.5.5.1 Hair Hang on a Pulley Diagram
8.5.6 Trapeze
Q. What is the basic method for rigging a Trapeze?
A. There are many ways a trapeze can be rigged. The following Trapeze
basic rigging diagrams should help:
8.5.6.1 Static or Swinging Trapeze Diagram
Mount point      Mount point
|                |
Carabineer        Carabineer
|                |
Rope             Rope
|                |
Carabineer        Carabineer
\          /
Trapeze Bar
8.5.6.2 Dance Trapeze Diagram
Mount point
|
Carabineer
|
Swivel
|
Carabineer
/       \
Rope    Rope
/          \
Carabineer   Carabineer
\           /
Trapeze Bar
8.5.6.3 Dance Trapeze on a Pulley Diagram
Mount point
|
Carabineer
|
                   Pulley - Rope - Lift Team
|
Rope
|
Carabineer
|
Swivel
|
Carabineer
/       \
Rope    Rope
/          \
Carabineer   Carabineer
\           /
Trapeze Bar
8.5.7 Straps
Q. What is the basic method for rigging aerial straps?
A. The following Straps basic rigging diagram should help:
8.5.7.1 Straps Diagrams
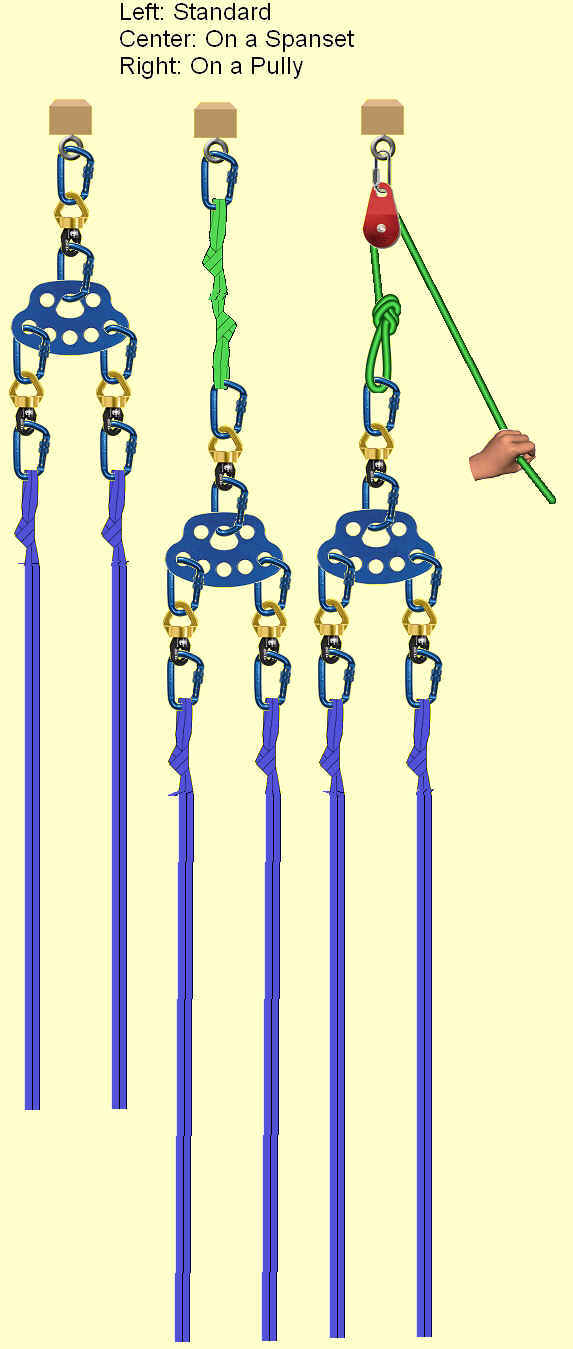
9. Liability and Insurance
Please see our new liability
and insurance resource.
10. Aerial Arts and Rigging Resources
Mailing Lists and Web Boards
- Yahoo
Trapeze Group. Mailing List for Flying Trapeze, Swinging Trapeze, Fixed
Trapeze, Double Trapeze, Washington Trapeze, Spanish Web, Aerial Hoop,
Vertical Rope, Tissu,.... For all those who are interested in Circus Aerial
Arts (from beginners to professionals; artists, coaches, school owners, rig
designers and riggers,...).
- Yahoo
Aerialriggers Group. This list offers riggers and aerialists an
opportunity to network and discuss issues in the circus/aerialist community.
- My
Space Aerial Silks Group. This myspace group is dedicated to topic of
aerial silks.
- Trapeze Arts Tribe This is a
tribe specifically for trapeze arts. Mostly flying or static trapeze.
Websites
Q. What other websites contain information like I found on this page?
A. Unfortunately, not many. The Simply
Circus Aerial Arts Tutorials, FAQ's & Handbooks website has lots of
resources for learning aerial arts, including complete textbooks, videos and
lots more. The Simply Circus web pages are continuously updated with new
resources for learning aerial arts, so check back often. Other sites we
have found with useful information include:
Q. Are there any other documents on the internet that deal with aerial
safety the way this FAQ does?
A. As far as we know, not much specifically. Here are the
documents we do know about:
- The American Youth Circus Organization has an
early draft proposal for Safety and Risk Management Standards for Aerial
Activities on there website. Currently this document is more or less
just an outline of what will eventually be included in this proposal.
- Cris Clark of Airspace Acrobatic Arts has given us permission to post his
companies internal Circus
rigging standard.
Books on Aerial Arts and Rigging
- Dreams of the Solo Trapeze by Mark Schreiber
- Learning to Fly; Trapeze reflections on Fear, Trust and the Joy of Letting
Go by Sam Keen
- The ABC's of Trapeze by Tony Steele (link)
- A Reckless Era of Aerial Performance, The Evolution of Trapeze by Steve
Gossard
- THE MODERN GYMNAST: Being Practical Instructions on the Horizontal Bar,
Parallel Bars, Vaulting Horse, Flying Trapeze, Etc. Etc. Etc.. by Spencer,
Charles.
- Aerial Skills Illustrated by Shana Kennedy (link)
- Circus in Schools Handbook by Sharon McCutcheon (link)
- The Aerial Circus Training and Safety Manual by Carrie Heller (link)
- Circus Techniques by Hovey Burgess
- Methodologies of the trapeze by Yvette Challande (French, link)
-
Methodology of
Cord and Fabrics Yvette Challande (French, link)
-
Methodologies
of the trapeze volume 2 by Yvette Challande (French, link)
- Also see the Rigging Book List
from the Training and Inspection Resource Center
- Preventing
Musculoskeletal Injury (MSI) This guide, designed for musicians and
dancers, is a wonderful resource guide on preventing MSI through stretching
and proper body mechanics.
Videos on Aerial Arts and Rigging
- Trapeze the Movie (1956) Starring: Burt Lancaster, Tony Curtis
- Secrets of the Circus Volume # 3 (Corde Lisse, Static and Dynamic Tricks
on a rope. Spanish Web, Spinning skills on a rope)
- Secrets of the Circus Volume # 3 (Trapeze, stationary trapeze tricks.
Cradle, 2 person cradle trapeze)
- Also see the rigging video list from the Training and Inspection Resource
Center
Finding videos on the internet
With the rise of video sites on the internet, it has become much easier to
find videos of aerial arts practices and performances. While not
exhaustive, the following should help you to locate videos.
- Altavista Video
- Google Video
- Grouper
- Yahoo Video
- YouTube.
Software
- LD
Calculator Lite (free software for MSWindows)
- RigMaster
(Excel file from AMT Flyware)
- Rigging
Data (Excel file, from The Detroit Stage Employees Union, IATSE local
38)
- Aerial Rigging (Excel File, helps calculate rigging loads and helps find
the weakest link in common aerial rigging. Experimental, alpha grade
software - not for production use)
Equipment Vendors
| Name & Contact Information |
Items sold and/or supported |
Aircat Aerial Arts
Cathy Gauch, Director
Aircat Aerial Arts
2525 Arapahoe Suite E4 PMB 336
Boulder, CO 80302
1-888-522-7631
http://www.aircat.net |
Aerial Silks |
Barry Cordage Ltd.
6110 des Grandes-Prairies
Montreal (Quebec), Canada
H1P 1A2
514-328-3888
1-800-305-CORD (2673)
http://www.barry.ca
mduguay@barry.ca |
Ropes, Spanish Web, Corde Lisse, Cloud Swing, Trapeze bars, Straps,
Lyra, Harnesses and Spotting Belts, Rigging components, handstand
tables, low-wire. |
Bobby's Bigtop
9380 Maple Street
Elberta, AL 36530
(251) 961-7885
www.BobbysBigTop.com |
Trapeze rigs, Single Trapeze with Cotton Rope, Single Trapeze with
Double Braided Nylon Rope, Double Single Trapeze, Double Trapeze with
Cotton Rope, Triple Trapeze, Spanish Web, Cradle, Safety Belts, Twisting
Belts, Lyra |
Custom Built Equipment, Inc.
467 W Krepps Rd
Xenia, Ohio USA 45385-9350
(937) 372-7581
http://www.cbe-circus.com
cbei@cbe-circus.com |
Spanish Webs, Cloud Swings, Silks, Lyra, Roman Rings, Straps, Single
Trap Bar (round end), Double Trap Bar, Triple Trap Bar, Fly Bar with
cables, Catcher Trap Bar without Padding and with cables Safety Belt,
rigging components |
The Fabric Depot
P.O. Box 411
GARWOOD, TEXAS 77442-0411
(979) 758-3100 (9-5CST)
www.FabricDepotCo.com
Susan@FabricDepotCo.com |
Sells fabrics. This company does NOT specialize in selling an
aerial fabric to aerialists, however they do supply Tricot fabric to a
great many of the aerial fabric resellers. http://www.fabricdepotco.com/2007FabCC/page9.html |
Jackie Tan
jtcircus@yahoo.com |
Stock and custom Lyra, as well as other equipment |
Ludwig Goppenhammer
1808 19th St.
Golden, Co 80401
ludwig@damnhot.com
http://www.damnhot.com |
Freestanding Aerial Rigs |
Nimble Arts
76 Cotton Mill Hill #300
Brattleboro, VT 05301
(802) 254-9780
actorbat@sover.net
http://www.nimblearts.org |
Rigging Components, Trapeze Bars, Aerial Silks |
Trapeze Arts, Inc.
1822 9th St
Oakland, CA 94607
(510) 419-0700
http://www.trapezearts.com |
Aerial Silks, Aerial Hoops, Rope / Spanish Web, Trapeze Bars, Ropes,
Rigs, Safety Belts, Slings, Swivels and related Rigging equipment.
|
Trapeze Rigging.com
http://www.trapezerigging.com
trapezerigging@gmail.com |
Trapeze rigs, Trapeze bars, Rigging components, Safety Belts,
low-wires and more |
Unicycle Voltige
3 impasse Jules Dalou - BP 172
91006 Evry Cedex
France
Tel: (33) 01 60 77 37 36
Fax: (33) 01 60 78 09 88
http://www.unicycle.fr
contact@unicycle.fr |
Trapeze rigs, Trapeze bars, Rigging components, Spanish Web, Cloud
Swings, Low-wire, Lyra |
US Glove
www.usglove.com |
Makes and sells various gymnastic grips (useful for trapeze) |
Warren Bacon
Rig2@aol.com |
Warren makes a wide variety of aerial apparatus, as well as being a
top notch rigger. |
Other lists of Equipment Vendors
Our list of equipment vendors is incomplete at best. The following
people and groups also maintain lists of aerial arts equipment vendors:
| |


|

